There’s a moment every spring that every boater knows. You’re standing at the dock or in the boatyard, coffee in hand, staring at your boat. Maybe she’s still cocooned in shrink-wrap or tucked into a storage lot on a trailer. Maybe she’s been sitting in a slip all winter under a tarp, storm lines gone slack. Either way, she’s sitting there still and patient, waiting for a little attention from you—and your wallet.
Recommissioning is the mirror image of layup—the same checklist run in reverse, with a few spring-specific “gotchas” thrown in for good measure. If you did your layup right, much of this will be a victory lap. If you didn’t, you’ll find out soon enough. Either way, the goal is the same: get her back in the water safely, with no surprises waiting for you at the inlet.

The Mechanical Handshake
I’m going to leave the deep engine specifics to the technical manuals. Methods vary too much by power plant, and the cost of a “whoops” is too high. If you’re not certain, call in a pro.
That said, if you followed your layup procedure correctly last fall, you are likely looking at a very short morning. If the oil was changed, the fuel stabilized, and the systems properly winterized, you probably just need to open the seacocks and turn the key. Recommissioning for the smart DIYer is less about “fixing” and more about a slow, systematic handshake between you and your boat to ensure everything is waking up exactly as it should.
The Recommissioning Checklist
If you took my advice last fall and left a notepad on the boat recording where things were stowed, that’s your map. Better yet, if you’re using Argo’s checklist feature, your recommissioning list should live right alongside your layup tasks—they are natural companions. Be systematic, be thorough, and don’t let the excitement of the season rush you past a critical safety check.
Start with a Fresh Look (Before the Splash)
Before you turn a wrench, walk the boat with fresh eyes. There are things you can only address while she’s “high and dry.”
- The Anode Audit: Check your sacrificial anodes. My rule: if they look even 15% wasted—meaning they aren’t entirely whole—replace them now. They are cheap insurance. While you’re at it, pick the right metal for the water. Zinc is your grandfather’s anode. Use Aluminum (Navalloy) for salt/brackish water, and Magnesium (Mg) for strictly freshwater.
- Don’t Forget the Pencils: While everyone looks at the hull, the internal engine and cooler anodes are often forgotten. Check these internal “pencils” now; if they’re crumbling, swap them before you start the raw water flow.
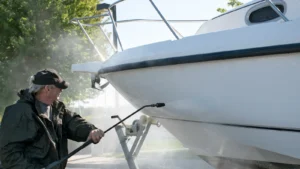
- Bottom Paint: If you use ablative paint, it needs a pressure wash or a scuff to “reactivate” it. If you don’t put many miles on the boat, avoid adding a full coat every year to prevent “alligator skin” or orange peel buildup. If the buildup is already severe, it might be time to hire out a professional media blast and barrier coat.
- Through-hulls and Seacocks: Exercise every seacock before splashing. If they’re seized, replace them. Inspect all hoses for cracking, stiffness, or mushiness, and ensure double hose clamps are tight and rust-free.
The Surface Shine
Once the structural checks are done, it’s time to bring back the “yacht” finish.
- Wash, Buff, and Wax: Winter is hard on gelcoat. A heavy wash followed by a high-quality marine wax is your primary defense against the UV rays that will bake your boat all summer.
- Brightwork & Canvas: Address flaking varnish or worn wood coatings now to prevent deep moisture damage. Lubricate your zippers and snaps—a little dab of PTFE or paraffin now prevents a torn seam later.
The Cover-Off Moment
Peeling back the shrink-wrap is like opening a time capsule.
- The Moisture Audit: Check your “cat-litter-and-calcium-chloride” buckets from the fall. Handle these with extreme care; the caked-up mess inside will permanently discolor or “burn” your gelcoat if spilled. Dispose of the contents in the trash off the boat—don’t try to dry them out or reuse them next fall.
- The Deep Breath: Open every locker and bilge access to let the boat breathe before you begin stowing your summer gear. If mold found a foothold, hit it early with a diluted white vinegar solution.
Electrical and Water Systems
- Batteries: Clean your terminals with a wire brush and treat them with a protectant like Lanacote. Charge them fully before powering up any systems.
- The Light Show: Test your nav lights, horn, VHF, and bilge pumps. For the pumps, pour a bucket of water in the bilge to ensure the float switch actually triggers.
- Sanitize the Tanks: Flush out “the pink stuff” (RV antifreeze) first. To shock the system, add one ounce (2 tablespoons) of unscented household bleach per 10 gallons of tank capacity. Fill, run the taps until you smell chlorine, let sit for 4 hours, then flush until the smell is gone. (Skip bleach for metal tanks).
- The Water Heater Trap: If you bypassed your water heater during layup, reconnect those lines and close the drain valve. Ensure the heater is completely full of water before you flip the breaker. Running a heating element in an empty tank will incinerate it in seconds. Fill first, heat second.
- Shore Water Warning: If you are connecting to dockside water for the first time, use a pressure regulator. Municipal water pressure can often exceed the 35–45 psi your boat’s plumbing is designed to handle, leading to blown fittings behind your cabinetry.
Safety Gear Audit
Spring is the best time for a “Safety Reset.” Check expiration dates on flares and fire extinguisher charges. If you have an inflatable life raft or PFDs, check the service dates and CO2 cylinders. Verify that your EPIRB and smoke detector batteries are fresh.
The First Shakedown
Once the drain plug is in and she’s floating, stay at the dock for twenty minutes. Close every single seacock before you splash, then open them one by one to isolate any potential leaks.
Resist the urge to run for your favorite anchorage immediately. Take a short loop in calm, familiar water. Run the engines up to temp, check the exhaust for raw-water flow, and verify your electronics are up to date and talking to each other.

Final Thoughts
Layup is about preservation, but recommissioning is about resurrection. It takes time and a bit of patience, but the boat has waited all winter for this. Do it right, and the season ahead will be everything you were dreaming about while you were watching the snow-plow races.
Stock the fridge, check the charts, and get underway. I’ll see you out there.